AWS PrivateLink in a Straightforward Setup
Josh Burgess •
#endpoint-security#aws#networking#cloud#vpc

Tips and Thought-Tricks from personal experience with PrivateLink and VPC Endpoints/Endpoint Services
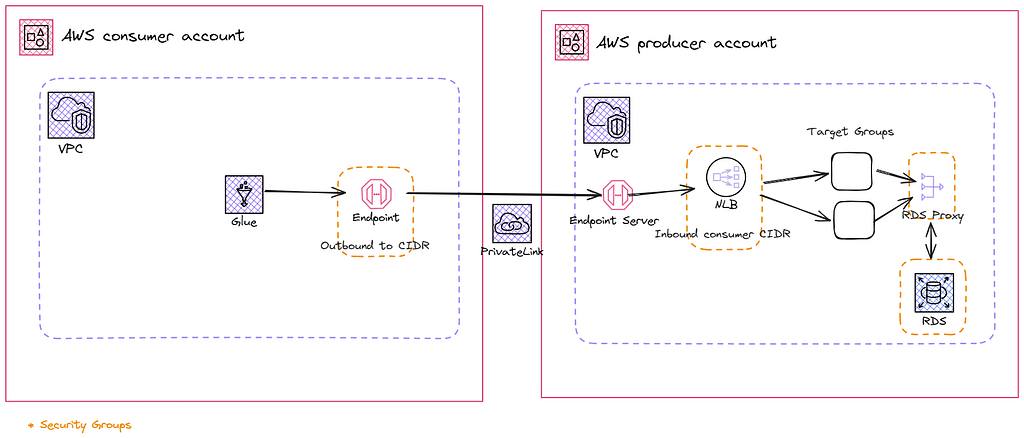
One of the most useful services, and yet seemingly complex, is AWS PrivateLink. The service itself is more of a design pattern in which you make a PrivateLink via VPC (Virtual Private Cloud) endpoints and endpoint services. With this combination, you can provide a connection between VPCs without peering or a Transit Gateway over AWS Backbone (their internet, not the public), this includes a connection between two VPCs in separate AWS accounts.
Why Would You Need This?
The advantage of using AWS PrivateLink is greater security, between AWS Partners, AWS Marketplace, your on-prem servers, and between VPCs both within the same account or between accounts. This can apply the other way too, where you can provide services from your VPC to customers while staying compliant with HIPAA, PCI, and other regulations.
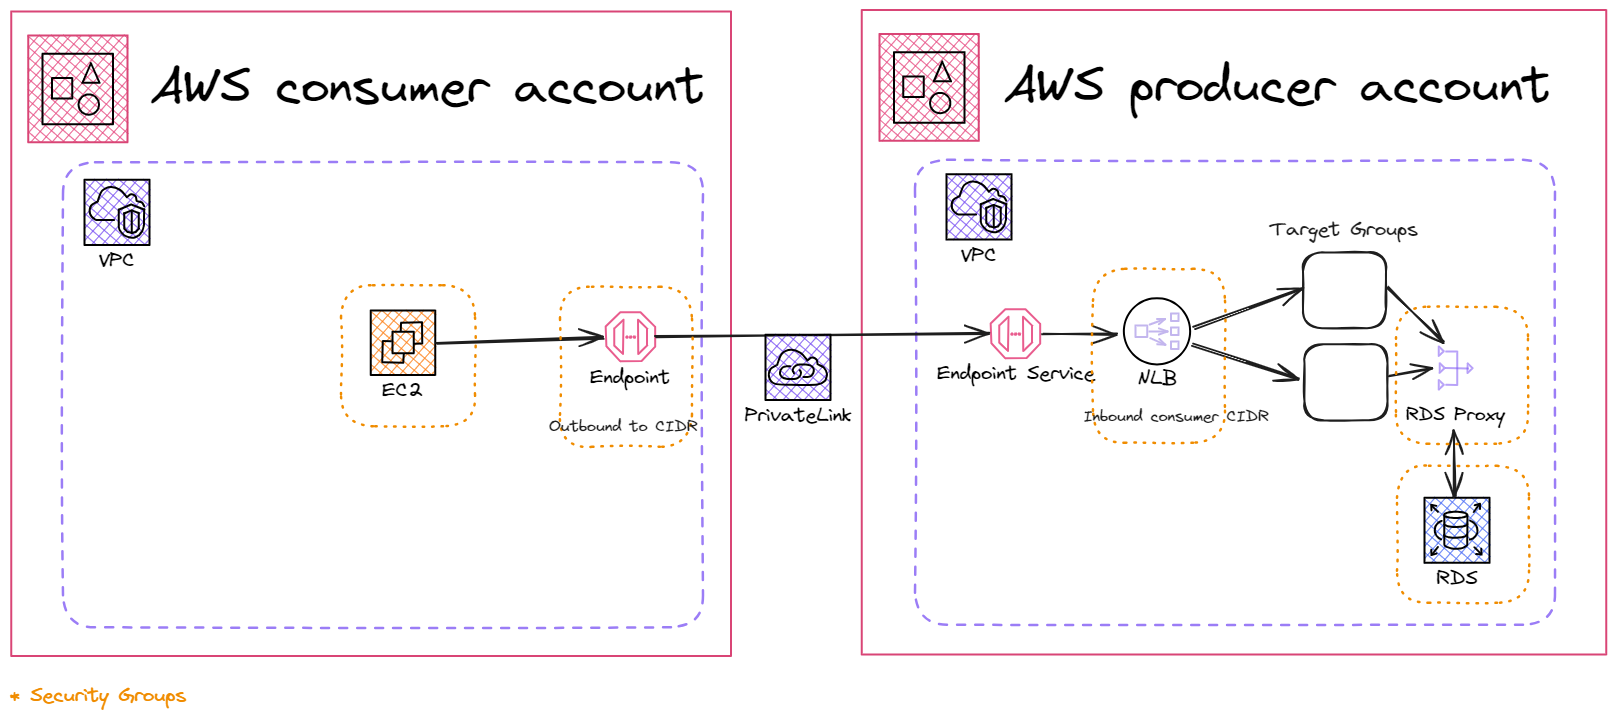
There are a couple of ways to go about creating your own SaaS and providing it to customers in AWS, one is with API Gatways, and the other is through PrivateLink. A common scenario faced is with ETL/ELT (Extract Load Transform) tools like Glue or Airbyte that live in an AWS Organization’s dedicated Data Engineering account and need to extract data from an RDS instance in a different account that may be affiliated with an application that the company has. PrivateLink can have multiple consumers while it has a single producer and eliminates the worry of CIDR overlap in your networks.
What about VPC Peering and Transit Gateways?
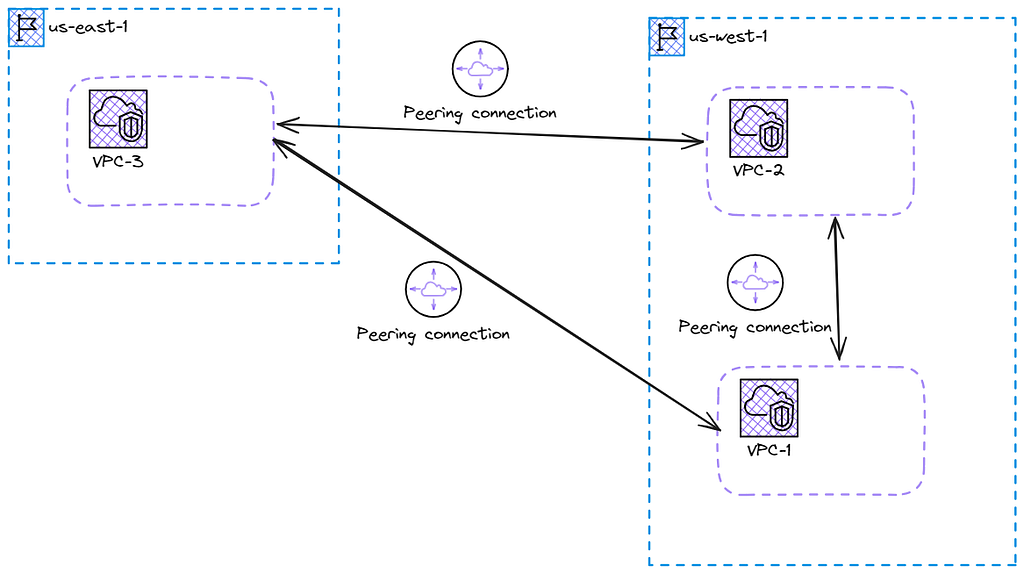
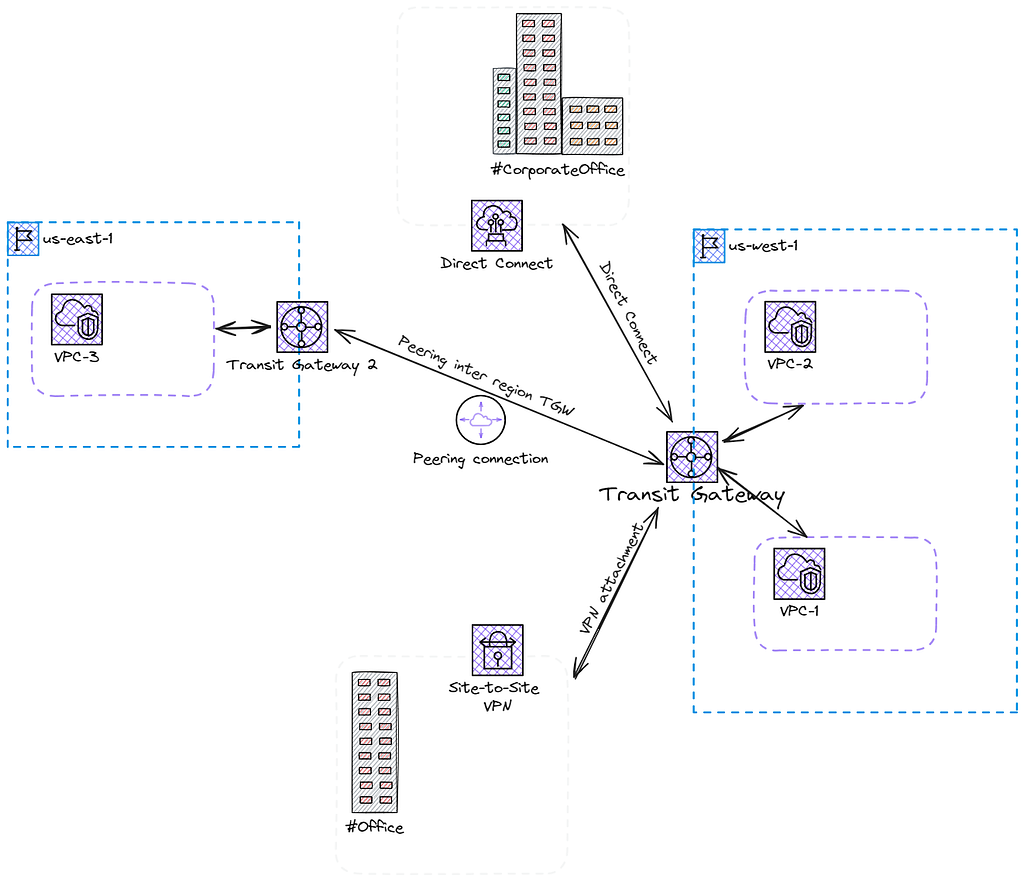
These two other AWS services may seem to provide a similar solution to what PrivateLink does at a glance, however, the biggest difference is the communication direction. PrivateLink is a unidirectional communication between services, a consumer in one VPC is consuming the service in a producer VPC, but the producer cannot consume anything from the consumer’s VPC. Both VPC Peering and Transit Gateway services provide Layer 3 bidirectional communication, meaning, that services in each VPC can talk to one another. VPC Peering and Transit Gateways can talk across regions, unlike PrivateLink.
VPC Peering is a full-mesh architecture that allows your VPCs to act as if they are inside each other. When scaling these VPCs you may want to peer another, or maybe 3 others. Each VPC would have to peer each other to fully talk with each other.
Something that solves this scenario and reduces overhead is the Transit Gateway. A Transit Gateway provides a hub-and-spoke model of allowing VPCs to connect. This solution is more scalable, although could introduce a small amount of latency with the network hops. Combining these services with other networking services like Direct Connect for your main office and a VPN for your branches can open up hybrid cloud opportunities and create a global network for your business.
Let’s Establish some PrivateLinks
Requirements
- Two AWS Accounts (we will be using free tier sizes)
- A Pulumi Account (it's free 😊), install the cli, and login via cli
- git clone https://github.com/joshbrgs/medium-tutorials.git
As a preface, the RDS and IAM configuration does not follow the best practices guidelines around the least-privileged since this is for demonstration purposes, if you would like to use this for production use, I encourage modifying the IAM policy for the secret and modifying the RDS instance to suit your needs. This includes upgrading the encryption for the proxy and RDS instance.
Producer Account
First, we will start with the producer account. Run these commands to get to the example code:
cd medium-tutorials/privatelink/producer
# The Profile of your AWS cli refer to this for sso or use iam access keys
# https://docs.aws.amazon.com/cli/latest/userguide/cli-configure-sso.html
pulumi config set aws:profile account1-profile-producer
pulumi up
# If it fails, rerun, there may have been a race condition 😬
You should have the following created in your account:
- RDS with a Postgres Engine and MD5 password encryption with a custom parameter group
- RDS Proxy and Subnet Group
- Secrets Manager Secret for DB password and username
- A VPC
- Two Subnets
- Security Groups for the DB and proxy
Once you have confirmed this we can start setting up our PrivateLink! We first need to identify the IP addresses assigned to the RDS Proxy endpoint, and for this, you will need a CLI network tool such as dig .
- On the Amazon RDS console, choose Proxies in the navigation pane.
- Choose the proxy and locate the endpoint, copy this for later
- Next you will want to modify the proxy to use MD5 as the authentication encryption method, this is a work around for the tutorial
- Use a networking CLI tool, such as dig, to find the proxy IP addresses: dig db-proxy.proxy-cfic8466upy8.us-east-1.rds.amazonaws.com
Note these IPs, you will need them later
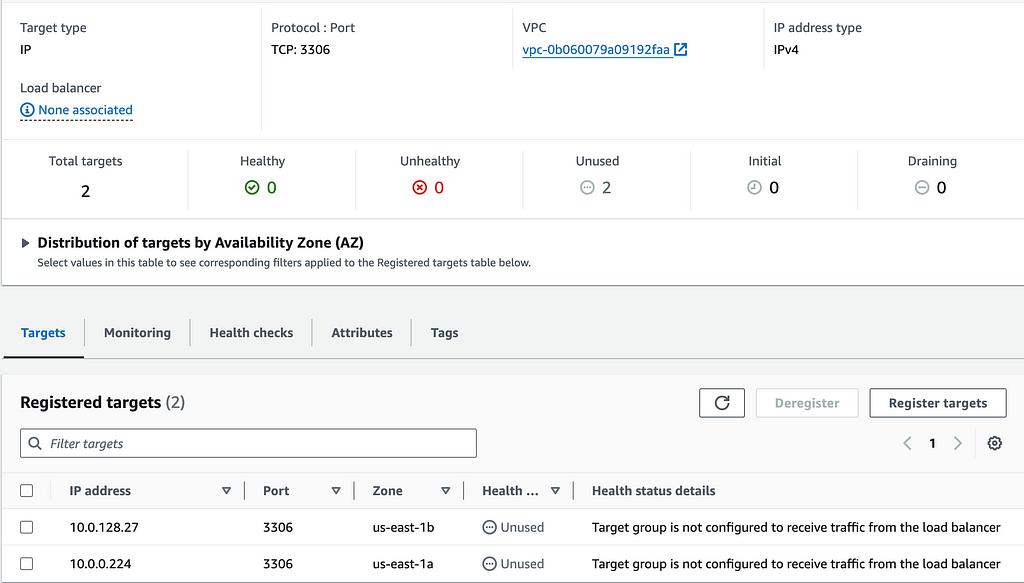
Target Group
These next 3 services combined create the PrivateLink endpoint for a producer account, the one that is providing a service.
- In EC2, go to the Target Groups section
- Create a Target Group with IP Addresses
- Change the protocol to TCP and change the port to 5432 (the default Postgres port)
- Select the producer-vpc, click Next
- Use the IP’s noted from the previous step
Network Load Balancer
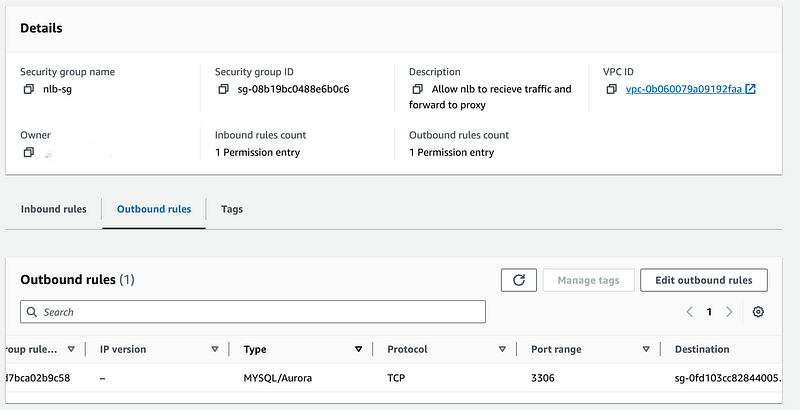
Next, let’s create a Network Load Balancer and its Security Group to route the traffic coming into our VPC to the correct service / Target Group.
To create the Security Group:
- In the EC2 Console, choose Security Groups and click Create Security Group
- Give it a name and description and choose the producer-vpc
- Add an inbound rule to receive 5432 traffic from the VPC CIDR range
- For the outbound rule, change the port to 5432 and the destination to the proxy security group
- Create descriptions as needed
- Go to the proxy security group, and click Edit inbound rules
- Delete the current Inbound Rule and Add a new one allowing port 5432 from the new Security Group we created for the Load Balancer
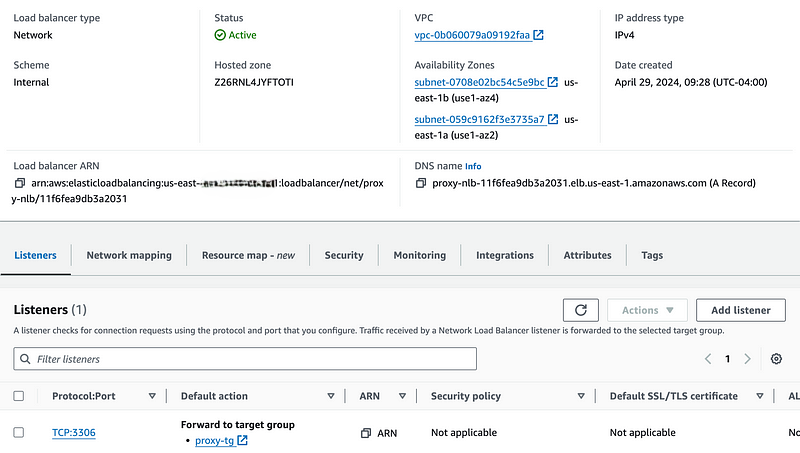
To create the Load Balancer:
- In EC2 Console, choose Load Balancers and Create Load Balancer
- Choose Network Load Balancer, give it a name, and select Internal for the scheme
- Select the producer-vpc and both AZs that show up (make sure the subnets are private)
- For the Security Group, make sure to click the one we just created in the previous step
- In the Listeners section, change the protocol to TCP and port 5432 and select the Target Group from the previous step for the default action.
- Click Create Load Balancer at the bottom, it may take a minute to provision
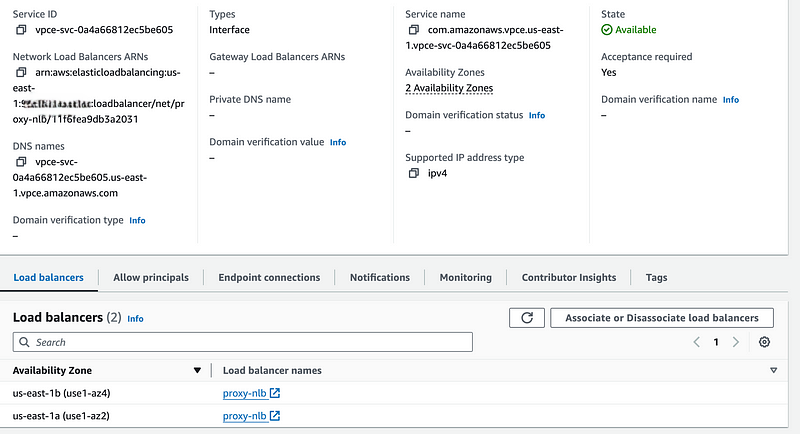
Endpoint Service
This is the next piece where our previous work all comes together, creating the Endpoint Service
- On the Amazon VPC console, choose Endpoint Services and click Create Endpoint Service
- Give it a name, select Network for Load Balancer Type, and select the NLB we created in the previous step, all else can stay default, and click Create
- In the Allow Principals tab, select Allow Principals, and enter your consumer account arn arn:aws:iam::<account-number>:root . This can be more restrictive against a given role or user too.
- Copy the Service Name for the next step
Consumer Account
Now let’s log into the consumer account as well as run these commands to spin up our network:
cd medium-tutorials/privatelink/consumer
pulumi config set aws:profile account2-profile-consumer
pulumi up
The following should have been created in this new consumer account:
- A VPC
- A Subnet
- A Security Group for Glue
VPC Endpoint and Accepting Connection
In your consumer AWS account, we will use Glue as an ETL tool and connect with a jdbc connector string to the Postgres db in our other AWS account! Let’s begin by creating a Security Group for the soon-to-come VPC Endpoint. Note that the Glue Security Group needs all ports inbound and outbound but uses the source for both as the same security groups.
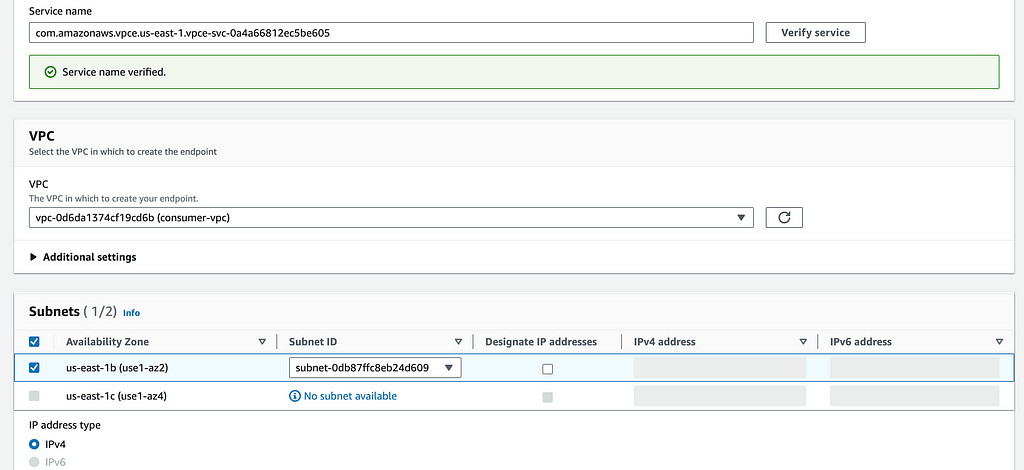
Go to the Amazon VPC Console, navigate to the Endpoints screen, and click Create Endpoint
- Provide a name, and select Other endpoint services under the Service category
- For the Service name under Service settings, provide the Service Endpoint Name you copied from the previous section and click Verify Service
- Select the consumer-vpc and one subnet will be grey while the other can be selected, select the one available, the other is to demonstrate how the Endpoint and Service Endpoint need the same AZs for connectivity.
- Select the Security Group for the endpoint (endpoint is in the name) and click Create endpoint
In the other account, we will have to accept/approve the connection of this endpoint and add inbound 5432 from the consumer CIDR to the NLB Security Group.
- Log back into the producer account
- Navigate to the VPC Console and Endpoint Services
- Go to the Endpoint Connections tab, click the Actions tab, and Accept the endpoint connection request
- After a few minutes, you should see Pending change to Available

Test the connection
Now we can go test out our connection from Glue! You will want to note down the RDS Database Identifier before we log back into the consumer account. The other info we need is the endpoint DNS name, which is the first in the list, and head over to the AWS Glue Console.
- Click Data Connections, and select the Create Connection button in the bottom pane
- In the grid, select JDBC and Next
- Add the jdbc url: jdbc:postgresql://<first-endpoint-dns-name>:5432/<database_name> and the username and password for the database, which can be found in the producer code in my git repo (since this is a non-secure tutorial) or in the secrets manager the “dbpassword” is created
- You will need to add Network options at the bottom
- Select the consumer-vpc in the drop-down, select the private subnet and Glue Security Group, and click Next
- Name the connector, you cannot change this later, and Create
- Last but not least, select the connection at the bottom of the window, click the Actions drop-down, select Test Connection, then select the Glue Service Role (If this does not exist you can create a new role with the AWSGlueServiceRole policy attached and AmazonS3FullAccess policy) If you get an error about the NAT Gateway or s3 endpoint, check that the subnet has the route table associated with it.

Success, you can now use a Glue Crawler or Glue ETL Job to extract data from the remote database securely!
Clean Up
To clean up this solution, you will just need to delete the resources we created in this example (endpoint, endpoint service, nlb, security groups, and target group, the rds database may need manually destroyed as well). The networking and instances can be deleted via pulumi destroy in the consumer and producer directories.
I tried this solution out with MySQL, and an issue arose with the “user@host” pattern. The host would need to change to the CIDR of the consumer VPC or a wildcard. To change this, we would need a Bastion Host to connect a MySQL client to the database. Since this is a tutorial, I wanted to keep as minimal resources as possible, but feel free to experiment!
Conclusion
PrivateLink lets you securely connect to separate VPCs keeping your traffic within AWS Backbone. This can be beneficial for exposing SaaS applications to developers using AWS, or even ensuring security between your own AWS accounts when using ELT/ETL tools. The PrivateLink connection is not limited to AWS Services, for you can set it up so that an EC2 instance running a service you created can be consumed, or you will commonly find PrivateLink as an option to consume your AWS Marketplace offerings. I hope this will help you in your journey to create the next big SaaS product!
References
- Use Amazon RDS Proxy and AWS PrivateLink to access Amazon RDS databases across AWS Organizations at American Family Insurance Group | Amazon Web Services
- What is AWS PrivateLink?
- What is VPC peering?
- What is Amazon VPC Transit Gateways?
- Direct Connect gateways
AWS PrivateLink in a Straightforward Setup was originally published in AWS Tip on Medium, where people are continuing the conversation by highlighting and responding to this story.